
*dances with excitement*
I made a shirt!
I made a BLOUSE!
A SILK blouse!
*does dougie*

lol As you can tell, I am very excited.
This is my second garment made from scratch, and my FIRST garment made from a commercial pattern.
Why I chose a Vogue pattern to be my first?
I. D. K.
But I made it through and learned ALOT in the process.
I used this fabric that I got on sale at JoAnn's.
I knew what I was going to make with it even before I left the store.

I got this pattern for free with the purchase of a Craftsy class.

Little did I know, the class had nothing to do with the top lol It was all about the skirt.
But... I'm not very fond of the skirt, so I took my chances figuring out the top on my own.
(sidenote: I just want to say the Craftsy class"40 Techniques Every Sewer Should Know" is like GOLD)
I made the blouse to the finished garment measurments that were closest to my body measurements which probably wasn't the BEST idea because I originally envisioned it being loose and flowy.
Maybe if I decide to make this again, I'll add an inch all the way up the side seams and add an inch to the length of it as well.
 |
| only four pattern pieces |
And it has BUTTONHOLES!!
My cousin, LaToya, can attest to HEART ATTACK I was about to have before putting my buttonholes on my shirt!
I made sure to use some scrap fabric to practice first
I made sure to use some scrap fabric to practice first

I also forced my cousin to say a prayer over each one before I started sewing them LOL (there are seven)
A couple of times, the machine would get stuck right in the middle of sewing the buttonhole and I would yell at her "ARE YOU PRAYING?!" lool
But they came out great! Prayer works lol

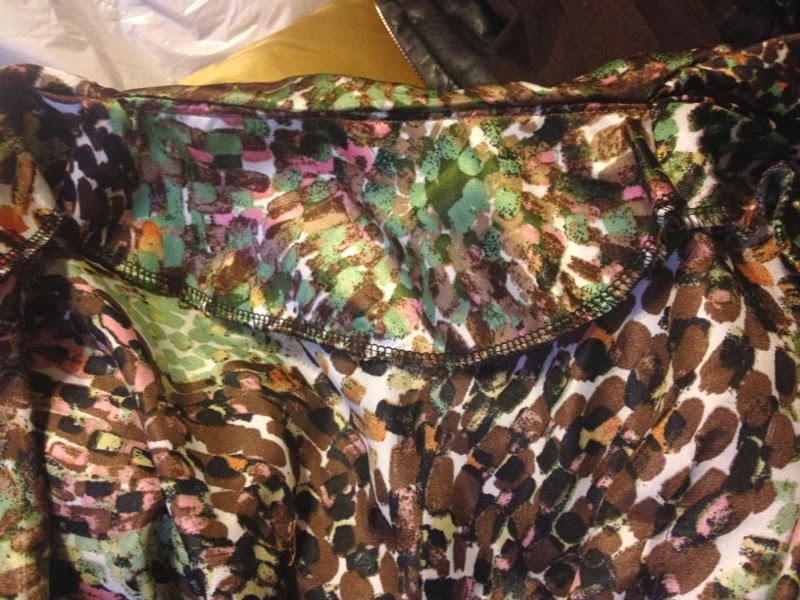
Because this fabric is silk, it frays like CRAZY.
LUCKILY, I bought a serger a few weeks ago!
I serged all of the side seams and all of the facings.
I also serged the darts that I had to cut open.

The hem of the garment and sleeves is done with steam-a-seam.
I was only supposed to use 1/4" steam-a-seam tape but unfortunately I hadn't read the directions correctly and picked up 1/2".
This can probably account (a little bit) for where the bottom of the garment sits.
But I think it turned out great for my first pattern!


1. Pin slippery fabric down to cut it.
I had a cardboard cutting board so being able to stick pins in it to hold the fabric down was AWESOME. I do want a cutting table but I think this cardboard will work perfectly fine for now.
2. How to use my serger
I took me forever to make sure everything was threaded correctly because my upper and lower looper threads kept breaking. Once I got it, it worked like a charm. I also found out how to use the knife to cut down seam allowances too. I LOVE my serger! It's so awesome! lol And it makes things look so professional.
3. How to Improvise
Because my fabric is printed so obnoxiously, I didn't know how I was going to mark it to align my buttonholes. What I did was pin the stabilizer on the fabric all the way up the facing and then pI marked the STABILIZER which is see through. It worked very well. If you have any tips on how I could have done this differently, PLEASE let me know. I'm definitely willing to learn how to properly do this lol

ALSO, I had no idea on how to transfer marking for darts onto this fabric.
Seriously, if there is some trick, let me know!
I ended up using 4 pins for each dart to know where they were and put them together accordingly. It was difficult.
 |
| Front pattern pieces with darts sewn and pressed |
 |
| Back pattern piece with darts sewn and pressed to the inside |
4. The importance of different needles and their sizes
While I had been sitting here thinking that the needles that came with my machine didn't have sizes on them.. they are definitely finely CARVED into each needle -__-.
And I was using this terribly huge needle to work with my silk and it kept leaving holes whenever I had to rip a seam or take out basting stitches.
Sooo I bought a needle organizer and put the correct needle in my machine.
I noticed that some needles need specific thread as well. Can't wait to experiment :-)
Thanks for reading!
Let me know what you think!
See you in the next post!
xoxo, Tasha

Thanks for reading!
Let me know what you think!
See you in the next post!
xoxo, Tasha

What a fun shirt! I didn't even notice the buttons at first, they go so well with the fabric. Sounds like it was a great learning process. Well done!
ReplyDeleteI tried to keep the buttons neutral because the shirt was so loud lol
DeleteThank you, and thank you so much for reading!
That's a great shirt! I think it looks beautiful on you. That type of fabric is really tricky to sew with. I made a shirt a few months ago out of something similar and there was a lot of praying that went into it! Prayer does work. :)
ReplyDeleteKristi - kopykat
LOL Thanks alot Kristi :-)
DeleteGreat job on your shirt--and I just have to say, you look so fabulous in your pictures! I struggle so much with posing in the stuff I make, so I am totally impressed when someone makes it look so easy :)
ReplyDeleteThank you!! And I'm glad the pics look okay because I always think I look really awkward lol
DeleteYou look great in that top- your buttonhole story is hilarious, maybe I should pray over mine first and they would turn out better :) Shannon
ReplyDeletehahahaha Thank you!
DeleteYou look great in your first commercial pattern garment! Silk is tough to work with, so you were very brave, too. :) I use pins a lot for doing darts instead of marking. Marking probably is better, but that is how I always have done it. Can't teach an old dog new tricks. ;)
ReplyDeleteThank you Stacy! and yea, i'm trying to figure out allll of the possible ways, then i'll probably do what's easiest lol
DeleteI like the way you talk about sewing. You sound very excited and brave to try new things! The blouse looks great on you!
ReplyDeleteAww, thank you so much!
DeleteI have not sewn much with slippery fabric but kept some helpful links I will post a few when I get a moment if you fancy. Sassy Sewing Bees https://facebook.com/sassysewingbees ❀
ReplyDeleteSure, thanks!
DeleteGreat job, love your fabric & thanks for bringing my attention to this pattern. I really hadn't given it a second look until now.
ReplyDeleteThank you :-)
DeleteThought I just posted this but not showing, so am trying again. Maybe a delay.
ReplyDeleteFeatured on Sassy Sewing Bees https://facebook.com/sassysewingbees ❀
Love the fabric and the style. Fantastic!
ReplyDeleteThanks, Sharon!
DeleteWhat a great shirt! You did a very good job! I love the closer fit as well :)
ReplyDeleteThank you! And thanks for reading! :-)
DeleteTasha,
ReplyDeleteThis is so cute on you. Love it.